Windows Registry Backup and Recovery Step-by-Step
Step 1>Log on to the computer as yourself
>Click Start >Run
>Type ntbackup and then click OK. The "Backup or Restore Wizard" window appears.

Step 2
>Click Advance Mode
>The Backup Utility window appears

Step 3
>Click Backup Wizard
>The "Welcome to the Backup Wizard" window appears.
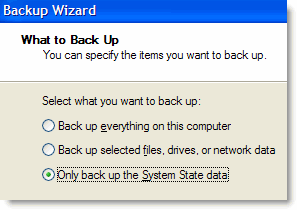
Step 4
>Click Next
>Click the Only back up the System State data radio button.
Step 5
>Click Next.
>The "Backup type, Destination, and Name" window appears.

Step 6
>Click Browse.
>If you are asked to insert a disk into the floppy disk drive, click Cancel.
>The "Save As" dialog box appears.
Step 7
>Click the My Documents icon on the left side of the "Save As" dialog box.
>Click Save.
>The "Backup Type, Destination, and Name" window re-appears
Step 8
>Click Next.
>The "Completing the Backup Wizard" appears

Step 9
>Click Advanced.
>The "Type of Backup" window appears

>The default backup type is "Normal". If available, make sure that "Backup Migrated Remote Storage Data" is not checked.
Step 10
>Click Next.
>The "How to Backup" window appears.

Step 11
>Click the Verify Data After Backup check box, and then click Next.
>The "Backup Options" window appears.

Step 12
>Click Replace the existing backups, and then click Next.
>The "When to Back up" window appears.

Step 13
>At the "When to Back Up" window, click Now and then click Next.
>The "Completing the Backup Wizard" window appears

Step 14
>Click Finish.
>the "Backup Progress" window appears

 >The "Backup Progress" window indicates that the backup is complete.
Step 15
>Click Report.
>The Notepad application window appears containing the report.

>Click Notepad.
>In the Backup Progress dialog box, click Close
>Close the Backup Utility
Step 16
>Click Start>Run.
>Type regedit in the "open" field. The Registry Editor window appears.

Step 17
>Expand the HKEY_CURRENT_USER Registry Key.
>Expand the Control Panel Registry Key.
>Expand the PowerCfg Registry Key
>Right-Click the Screen Saver. Stars Registry Key.
>Click Delete.
>Click File>Exit in the Registry Editor window.
>Browse to the "My Documents" folder and locate the"backup.bkf" file.
>Double-click the backup file to bring up the Backup Utility Wizard.
>Click Next.
Step 18
>Click the Restore files and settings radio button and then click Next.
>The "What to Restore" window appears.
Step 19
>Expand the file.
>Expand the backup.bkf file.
>Click the System State check box.
Step 20
>Click Next.
>The "Completing the Backup or Restore Wizard" window appears.
Step 21
>Click Advance.
>The "Where to Restore" window appears.
Step 22
>The default restoration location is "Original Location".
>Click Next.
>The "Restoring System State will always overwrite current System State unless restoring to an alternate location" warning window appears.
>Click OK.
Step 23
>Click the Replace existing files if they are older than backup files radio button.
Step 24
>Click Next.
>The "Advanced Restore Options" window appears.
>Be sure that all three check boxes are selected, and then click Next.
>Click Finish.
>the system recovery begins by copying the files back to the computer.
>When prompted to restart the computer, click Yes. The computer will restart.
Step 25
>Click start>Run
>Type regedit in the "Open" Field.
>Click OK.
>You should see the Screen Saver Stars" Registry key in the Registry Editor application window.
>Click File>Exit.
Finish
Resources of Pictures:
https://www.pctechguide.com
https://www.winhelponline.com
http://www.theeldergeek.com
https://www.howtogeek.com

Comments
Post a Comment